
기존에 사용하던 오픈소스
회사에서 개발하고 있는 서비스 앱에 다음과 같은 캘린더가 있습니다.

이 캘린더는 다음과 같은 기능을 합니다.
- 날짜 선택 버튼을 누르면
Navigation을 통해 표시가 된다. - 날짜를 선택하면 해당 날짜에 작성 된 자신의 글이 목록에 노출 된다.
- 세로 방향으로 스크롤을 하면서 1개월씩 뒤로 앞으로 이동할 수 있다.
매우 심플한 기능들입니다.
우리는 이 기능을 React Native Calendars라는 오픈소스 라이브러리를 이용해 작업해 둔 상태였습니다.
기획팀의 기능 추가 요청
며칠 전, 기획팀은 사용성 증가를 위해서 캘린더 관련 기능 추가를 요청했습니다.
추가해야 할 기능들
- 년, 월을 직접 선택하여 한번에 건너뛸 수 있는 기능
- 날짜 범위 검색
- 각 캘린더 사이에 컴포넌트 배치
이렇게 세 가지 요청이 들어왔습니다.
가능 여부 판단
년, 월을 한번에 건너뛸 수 있는 기능 (추가 가능)
React Native Calendars Documentation을 참고해서 해당 기능을 지원하는지 알아봤습니다.
해당 기능을 직접적으로 지원하지는 않지만 renderheader Property를 지원하므로 년, 월에 대한 건너뛰기 기능을 자체적으로 제작하는 방향으로 해결할 수 있다고 판단하였습니다.
날짜 범위 검색 (추가 가능)
다행히도 해당 부분은 공식 API에서 지원을 하는 기능으로 보이기에 가능하다고 판단했습니다.

1
2
3
4
5
6
7
8
9
10
11
12
<Calendar
  markingType={'period'}
  markedDates={{
    '2012-05-15': {marked: true, dotColor: '#50cebb'},
    '2012-05-16': {marked: true, dotColor: '#50cebb'},
    '2012-05-21': {startingDay: true, color: '#50cebb', textColor: 'white'},
    '2012-05-22': {color: '#70d7c7', textColor: 'white'},
    '2012-05-23': {color: '#70d7c7', textColor: 'white', marked: true, dotColor: 'white'},
    '2012-05-24': {color: '#70d7c7', textColor: 'white'},
    '2012-05-25': {endingDay: true, color: '#50cebb', textColor: 'white'}
  }}
/>
markedDates Property에 YYYY-MM-DD 포맷의 key들로 이루어진 Object를 넣고, 범위로 표시하고 싶은 날짜의 시작일에는 startingDay Propery를, 종료일에는 endingDay를 삽입하는 방식으로 해결할 수 있다고 적혀있습니다.
각 캘린더 사이에 컴포넌트 배치 (추가 불가능)
가장 큰 문제는 이 부분이였습니다.
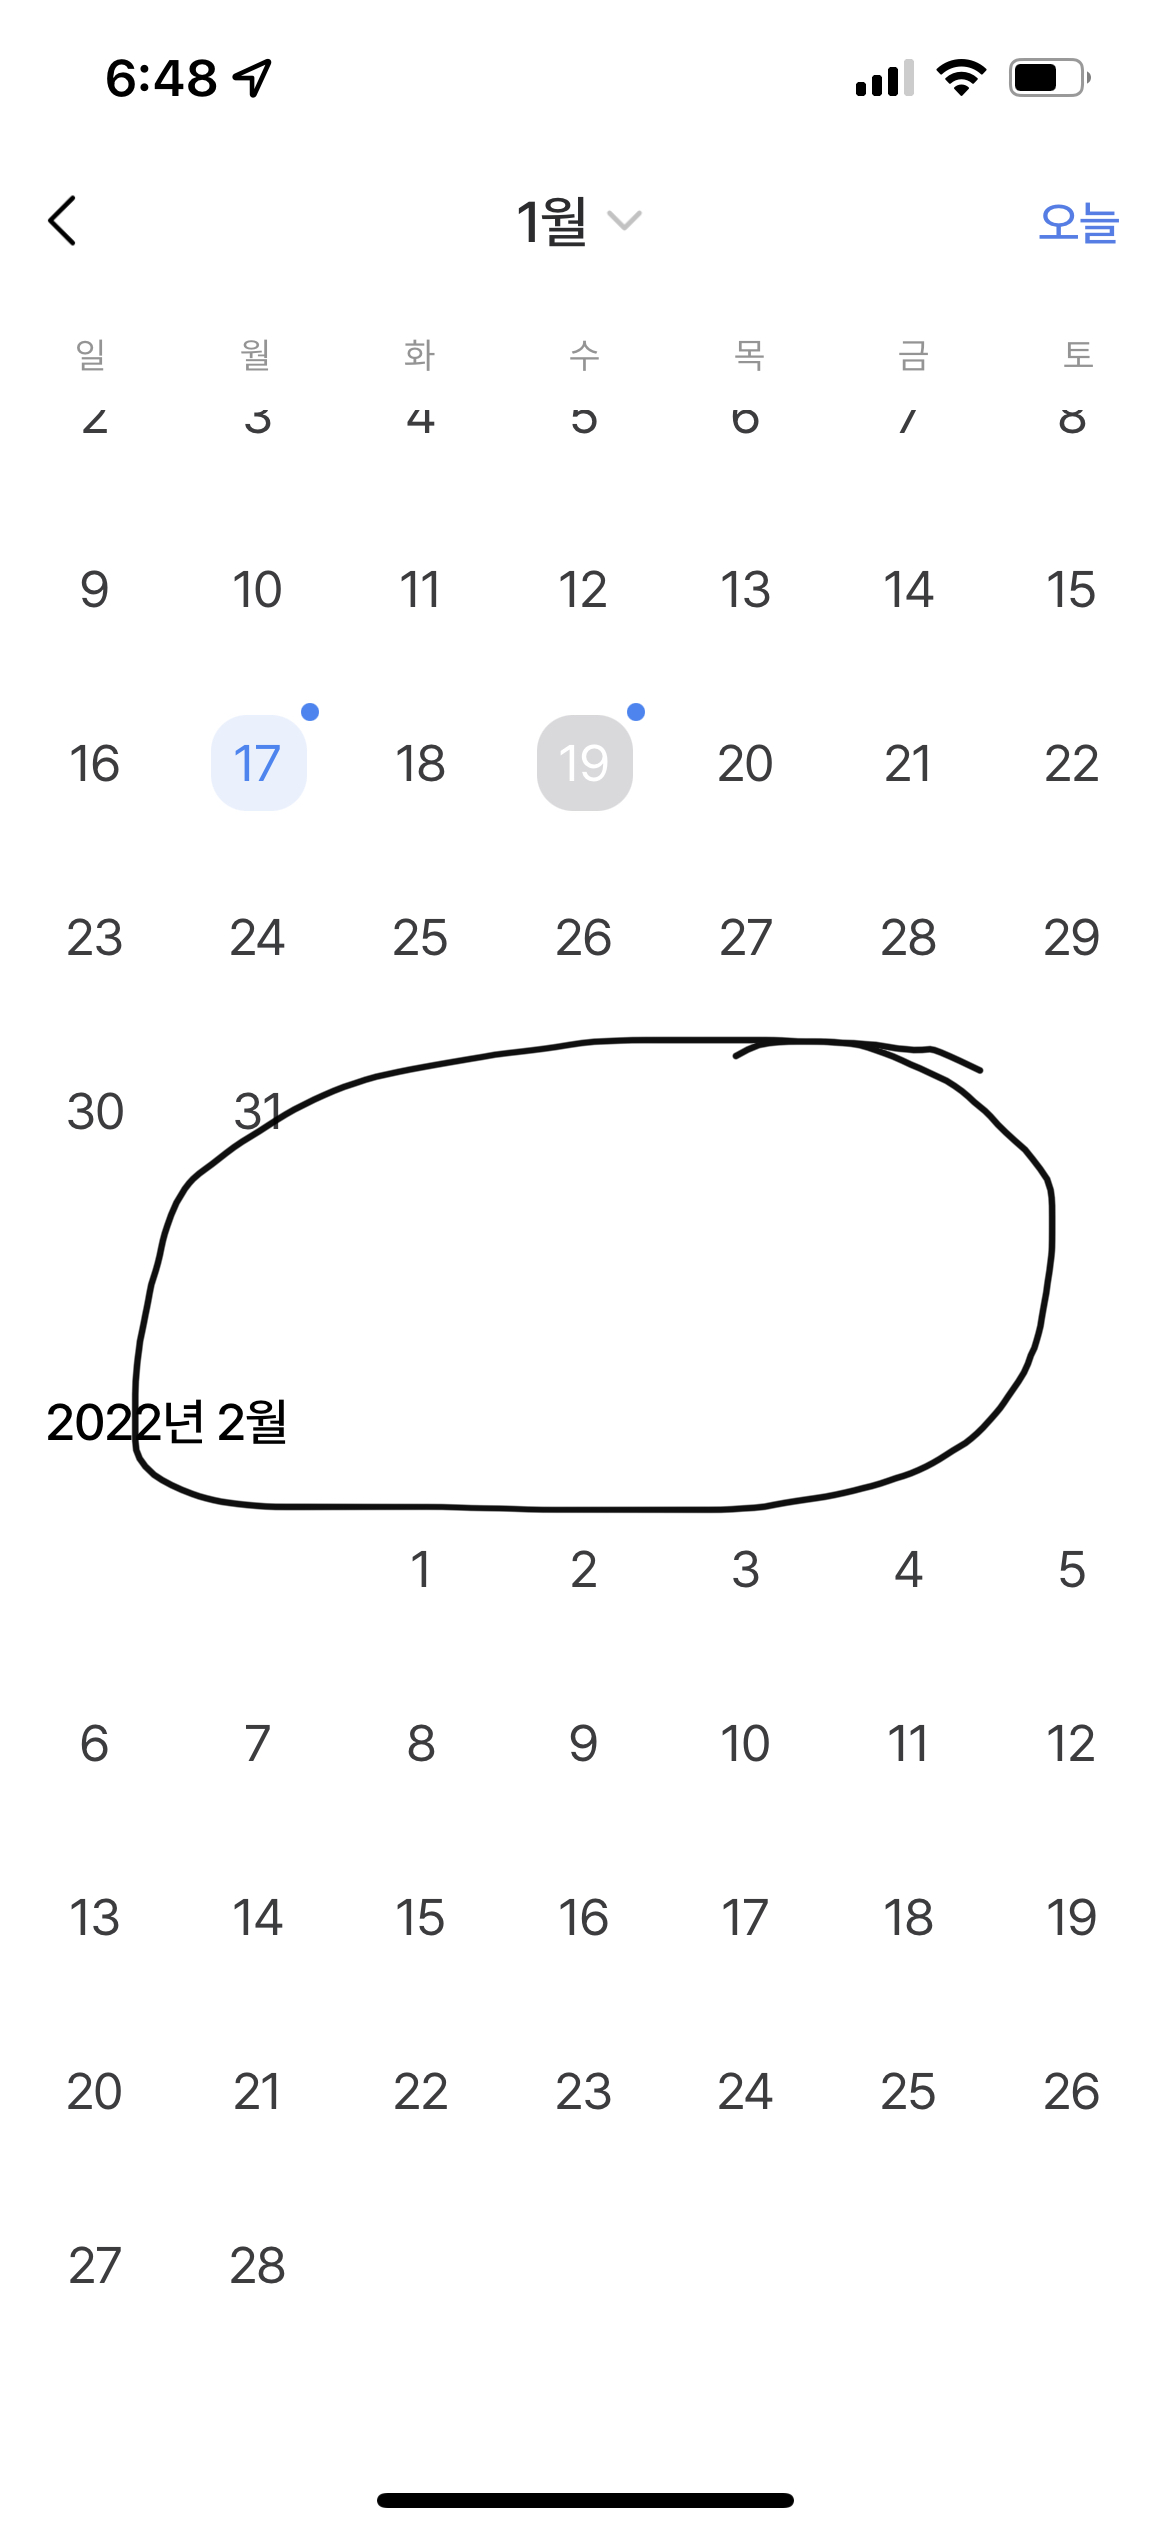
동그랗게 표시한 부분, 각 캘린더 사이에 우리가 직접 만든 컴포넌트를 삽입할 수 있냐는 내용인데, 공식 문서에 따르면 마땅한 방법이 존재하지 않습니다.
왜 안되나?
- 스크롤 캘린더는
<CalendarList />컴포넌트를 활용하여 구성하기 때문에 각각의 캘린더가 아닌 사실상 하나의 캘린더임 -
renderHeader처럼 헤더를 정의하는 Property나renderDay처럼 날짜를 렌더링하는 Property는 있지만 하단에 추가하는 Property가 없음
없으면 만들어야지
이번 추가 개발 사항에서 하필이면 해당 부분은 가장 Priority가 높다고 봐도 되는 부분이였기에 난감한 상황이였습니다.
이제 와서 다른 캘린더를 사용하자니 기존에 개발 되어 있던 기능들이 너무 방대했기에 이 작업들을 다시 진행하는 것은 사실상 무리였습니다.
무엇보다 다른 캘린더들은 이 캘린더만큼의 확장성을 지원하지 않고, React Native 생태계에서 가장 유명한 캘린더 라이브러리가 이 라이브러리였기 때문에 변경은 최대한 지양해야 했습니다.
React Native 캘린더 라이브러리 순위표
그래서 최대한 이 캘린더를 활용하는 방향으로 작업을 진행하기로 결정했고, 그렇게 한 번도 하지 못했던 오픈소스 개발이 시작 되었습니다.
오픈소스 뜯어보기
시작은 언제나 index
원래 아무것도 모를 때는 진입점부터 뜯어봐야 합니다.
프로젝트의 진입점인 src/index.ts부터 오픈을 하니 컴포넌트를 불러와서 export하는 페이지였습니다.
1
2
3
4
5
6
7
8
9
10
11
export {default as Calendar} from './calendar';
export type {CalendarProps} from './calendar';
export {default as CalendarList} from './calendar-list';
export type {CalendarListProps} from './calendar-list';
export {default as Agenda} from './agenda';
export type {AgendaProps} from './agenda';
export {default as ExpandableCalendar} from './expandableCalendar';
export type {ExpandableCalendarProps} from './expandableCalendar';
export {default as WeekCalendar} from './expandableCalendar/WeekCalendar';
export type {WeekCalendarProps} from './expandableCalendar/WeekCalendar';
// 중략
우리가 해야하는 것은 CalendarList 컴포넌트에 renderFooter를 추가하는 것.
그 전에 모든 캘린더의 원형이 되는 것 같은 Calendar부터 시작하기로 했습니다.
모든 것은 언제나 원형부터
어차피 CalendarList, Agenda와 같은 확장성 컴포넌트들은 Calendar를 이용해서 만들었을테니 가장 기초가 되는 calendar/index.tsx를 열어보기로 했습니다.
특징
Calendar를 포함한 해당 라이브러리의 모든 컴포넌트들은 다음과 같은 특징을 갖고 있었습니다.
-
export interface CalendarProps와 같이 Interface로 Type을 정의하고 추출하고 있음 -
Class안에서static displayName = 'Calendar';과 같이 컴포넌트의 이름을 정의하고 있음 -
Class안에서 해당 컴포넌트가 받을Props의 원형을static propTypes로 정의하고 있음 - 컴포넌트들이 대부분
Class Component구조로 작성 되어 있음
흐름
현재로서는 변수가 정의 되어서 어떻게 쓰이는지에 대한 흐름을 모르니 일단 export는 무시하고 넘어갑니다.
지금으로서 유일하게 가능한 것은 화면단에 데이터를 뿌리는 render() 메소드를 분석하는 것이였기에 가장 먼저 render를 찾아갔습니다.
1
2
3
4
5
6
7
8
9
10
11
12
13
14
15
16
17
18
  render() {
    const {enableSwipeMonths, style} = this.props;
    const GestureComponent = enableSwipeMonths ? GestureRecognizer : View;
    const gestureProps = enableSwipeMonths ? this.swipeProps : undefined;

    return (
      <GestureComponent {...gestureProps}>
        <View
          style={[this.style.container, style]}
          accessibilityElementsHidden={this.props.accessibilityElementsHidden} // iOS
          importantForAccessibility={this.props.importantForAccessibility} // Android
        >
          {this.renderHeader()}
          {this.renderMonth()}
        </View>
      </GestureComponent>
    );
  }
renderHeader라는 메소드와 renderMonth라는 메소드를 통해 캘린더 하나를 뿌려주고 있는 형태라는 것을 알 수 있습니다.
우리가 여기서 하고싶은건 renderFooter를 만드는 일이죠. 그렇지만 원리를 모르기에 renderHeader를 벤치마킹 하기 위해 renderHeader의 구조를 잠깐 살펴 봅시다.
renderHeader 구조
1
2
3
4
5
6
7
8
9
10
11
12
13
14
15
16
17
18
19
20
21
22
23
24
25
26
27
28
  renderHeader() {
    const {customHeader, headerStyle, displayLoadingIndicator, markedDates, testID} = this.props;
    let indicator;

    if (this.state.currentMonth) {
      const lastMonthOfDay = toMarkingFormat(this.state.currentMonth.clone().addMonths(1, true).setDate(1).addDays(-1));
      if (displayLoadingIndicator && !markedDates?.[lastMonthOfDay]) {
        indicator = true;
      }
    }

    const headerProps = extractComponentProps(CalendarHeader, this.props);
    const CustomHeader = customHeader;
    const HeaderComponent = customHeader ? CustomHeader : CalendarHeader;
    const ref = customHeader ?  undefined : this.header;

    return (
      <HeaderComponent
        {...headerProps}
        testID={testID}
        style={headerStyle}
        ref={ref}
        month={this.state.currentMonth}
        addMonth={this.addMonth}
        displayLoadingIndicator={indicator}
      />
    );
  }
renderFooter 생성
renderHeader 메소드를 벤치마킹하여 비슷한 구조로 renderFooter를 만들어줍니다.
1
2
3
4
5
6
7
8
9
10
11
12
  renderFooter() {
    const {customFooter, renderFooter} = this.props;
    const Footer = customFooter ? customFooter : CalendarFooter;
    const ref = customFooter ? undefined : this.footer;
    return (
      <Footer
        ref={ref}
        month={this.state.currentMonth}
        renderFooter={renderFooter}
      />
    );
  }
기본적은 구조는 renderHeader 메소드의 구조를 그대로 갖고왔습니다.
-
props로customFooter를 받습니다. 아마 얘가 사용자 정의 컴포넌트를 넘기는 Property겠죠. -
customFooter가 안넘어온다면 컴포넌트에서 자체적으로 정의한 Basic 컴포넌트를 호출하고, 있다면customFooter컴포넌트를 사용합니다.
그러면 이제 CalendarFooter를 정의하지 않았으니 만들러 가야겠네요.
Basic Footer Class 만들기
Header 구조 벤치마킹 하기
오픈소스 개발자의 컨벤션에 맞추기 위해, 비교 대상이 되는 header의 구조를 그대로 벤치마킹 하여 footer를 만듭니다.
-
export interface CalendarFooterProps일단FooterPropsInterface를 추출 해주고 -
class CalendarFooter extends React.Component<CalendarFooterProps>Class 선언 해주고 -
static displayName = 'CalendarFooter';컴포넌트 이름 정의 해주고 -
static propTypes =Props 원형 정의 해주면 기본 구조는 완성
Header 렌더링 방식 벤치마킹하기
header/index.tsx를 봤을 때 렌더링의 핵심 기능은 이 부분 같습니다.
다른건 다 모르겠고, renderHeader를 Property로 받아서 renderHeader가 있다면 Property의 renderHeader를 실행하는게 인상깊네요.
이 구조를 그대로 벤치마킹 합니다.
1
2
3
4
5
6
7
8
9
10
11
12
13
14
15
16
17
18
19
20
21
22
23
24
25
  renderHeader = () => {
    const {customHeaderTitle, renderHeader, month, monthFormat, testID, webAriaLevel} = this.props;
    const webProps = Platform.OS === 'web' ? {'aria-level': webAriaLevel} : {};

    if (renderHeader) {
      return renderHeader(month);
    }

    if (customHeaderTitle) {
      return customHeaderTitle;
    }

    return (
      <Fragment>
        <Text
          allowFontScaling={false}
          style={this.style.monthText}
          testID={testID ? `${HEADER_MONTH_NAME}-${testID}` : HEADER_MONTH_NAME}
          {...webProps}
        >
          {formatNumbers(month?.toString(monthFormat))}
        </Text>
      </Fragment>
    );
  };
renderFooter 완성
최대한 핵심 기능 원리를 이해하여 간단하게 만들면 이렇게 됩니다.
1
2
3
4
5
6
7
8
  renderFooter() {
    const {props} = this;
    const {renderFooter, ...other} = props;
    if (renderFooter) return renderFooter(other);
    return (
      <View {...props}></View>
    );
  }
BasicHeader와는 다르게 기본 기능이 없기 때문에 단순 <View> 컴포넌트만을 띄우고 props를 바인드 하는 기능을 제작합니다.
다만, renderFooter를 통해서 사용자 정의 컴포넌트가 넘어오는 경우를 커버하기 위해서 매개변수로 현재 캘린더 컴포넌트가 갖고 있는 모든 props 정보를 매개변수로 넘겨줍니다.
그렇게 되면 API를 사용하는 사용자 입장에서는 renderFooter Property의 Callback 안에서 보다 다양한 기능을 만들 수 있겠죠.
약간 신경 쓰이는 점
이 쯤에서 약간 신경 쓰이는 부분이 있습니다.
static displayName과 propsTypes는 왜 정의하는걸까요?
그 부분을 알아보기 위해 renderHeader 메소드를 잠깐 다시 살펴봅시다.
1
2
3
4
5
6
7
8
9
10
11
12
13
14
15
16
17
18
19
20
21
22
23
24
25
26
27
28
  renderHeader() {
    const {customHeader, headerStyle, displayLoadingIndicator, markedDates, testID} = this.props;
    let indicator;

    if (this.state.currentMonth) {
      const lastMonthOfDay = toMarkingFormat(this.state.currentMonth.clone().addMonths(1, true).setDate(1).addDays(-1));
      if (displayLoadingIndicator && !markedDates?.[lastMonthOfDay]) {
        indicator = true;
      }
    }

    const headerProps = extractComponentProps(CalendarHeader, this.props);
    const CustomHeader = customHeader;
    const HeaderComponent = customHeader ? CustomHeader : CalendarHeader;
    const ref = customHeader ?  undefined : this.header;

    return (
      <HeaderComponent
        {...headerProps}
        testID={testID}
        style={headerStyle}
        ref={ref}
        month={this.state.currentMonth}
        addMonth={this.addMonth}
        displayLoadingIndicator={indicator}
      />
    );
  }
여기서 신경쓰이는 부분이 하나 있는데, extractComponentProps 함수의 존재입니다.
얘는 역할이 뭘까요? 함수 선언부로 가봅시다.
exteractComponentProps
1
2
3
4
5
6
7
8
9
10
11
12
export function extractComponentProps(component: any, props: any, ignoreProps?: string[]) {
  const componentPropTypes = component.propTypes;
  if (componentPropTypes) {
    const keys = Object.keys(componentPropTypes);
    const componentProps = omit(
      pickBy(props, (_value: any, key: any) => includes(keys, key)),
      ignoreProps
    );
    return componentProps;
  }
  return {};
}
보아하니 여기서 쓰이는 멤버 변수들이였군요.
- 컴포넌트의 클래스 안에서 선언 된
propTypesObject에 적혀있는key만을 유효한Property로 간주함 - 그 외의 props는 다 잘라버림
보안상의 이슈로 엄한 Property가 넘어오는 것을 막는 메소드였군요!
완성
캘린더 원형에 사용 된 Footer
1
2
3
  <Calendar
    customFooter={customFooter}
  />
스크롤 캘린더에 사용 된 Footer

1
2
3
  <CalendarList
    renderFooter={renderCustomFooter}
  />
가로 스크롤 캘린더에 사용 된 Footer
1
2
3
4
  <CalendarList
    horizontal
    renderFooter={renderFooter}
  />
느낀 점
오리지널 레포지토리에도 Merge Request를 날리긴 했으나, 이게 Merge 될 지는 잘 모르겠습니다.
급한대로 우리가 필요한 기능을 넣는걸 우선으로 했기 때문에 프로젝트에 대한 완전한 이해도 하지 않은 상황에서 만든 부분이라 날림이 조금 있기 때문입니다.
하지만 처음으로 해보는 오픈소스 기여였기 때문에 인기 있는 오픈소스를 내 손으로 수정한다는 사실이 굉장히 흥미로웠고, 이를 해부하는 과정에서 상당히 깔끔한 구조의 코드를 배우는 등 아주 유익한 경험이 되었다고 생각합니다.
아직 커미터의 리뷰가 도착하지 않았기 때문에 병합 대기 상태입니다만, 유익한 리뷰가 달린다면 참 좋을 것 같습니다!
감사합니다!